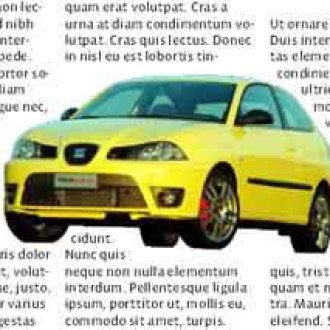
Now, you are starting your way up in design business, working with programs, but you always wanted to make that fancy text wrap around an image of specific shape?
Here is the right tutorial for you that will get you started with text wraps around images in no time.
Step 1.
First open up your image in Photoshop. We have used the following image:

Now you will learn the technique of cutting the image from it’s background but with leaving the background there.
Step 2.
Choose PEN TOOL (keyboard shortcut P) from tools palette.

Now zoom up a bit to your picture, (where would you like to start the cutting process) and click with a Pen Tool to set a first point of cut line. Now click for the second point somewhere near the first point, just to see how this works… This is the tricky part next, if you click and hold that click, then drag your mouse a bit, you will drag out a bezier curve, wow, now you can cut oval shapes! And if you hold ALT on keyboard while holding that click you can make hard-edged points in bezier curve. Play a bit with your curve, if you click on a wrong place, there is no problem there, just press CTRL and your cursor will transform from pen tool to white cursor, now just click that point you got on wrong place and drag it to desired place. Again if you later get some points wrong (bezier curves) you can easily edit them by pressing ALT and click’n’drag them…

Step 3.
Continue to make points all the way until you round the whole item you are cutting, in our case – the car. NOTE: while you are clicking and making points, to navigate around the image press space and drag with mouse click pressed, you can that way zoom-in and navigate easily while making points.
Step 4.
Too see how your path is look like, you can click on Paths under Layers palette. If you do not see the Paths palette, click on Window -> Paths to reveal it. When you have finished and closed the path (that means you have reached the start point and clicked on it to close the path), you can move to Paths palette. Click on that Work Path (if not selected).
Step 5.
Click on that little arrow in the palette and choose “Save Path…”, choose a name for it or leave the default one and click ok.

Again click on that arrow and choose “Clipping Path”, in the Flatness enter “0,2” device pixels. Click ok. Now your path became clipping path, all you have to do now is save your image as TIFF file.
Step 6.
Open it up in some Page Layout application such as QuarkXPress and put it under the text box. We will show now how it works with the QuarkXPress, but anyway it’s the same with almost any Page Lay-outing application we know about. So, open up your file with text in Quark, draw a new picture box where you want to get your picture.
Step 7. (optional)
Now get your picture in that box, by pressing CTRL+E. Browse for your picture in the menu and choose it. Now reduce your picture, if it’s too big… And go to Item -> Modify or press CTRL+M. Go to Runaround and for the Type: choose “Embedded Path”. In Outset: enter 6 pt or more… And finally go to Clipping, choose for Type: Embedded Path, and play with Outset if your picture have white margins on darker backgrounds, outset can be negative number. Finally click OK and text will wrap around your image!

NOTE: Runaround is for wrapping text around the image or other objects. Clipping is using embedded path (the one you have made in Photoshop) for cutting the image of it’s background. You can open that TIFF file again in Photoshop, and use that Path you just created, to cut-out the picture from it’s background and use it for later manipulations in Photoshop. To do that go to Paths palette, then hold CTRL and click on your path, you will notice that you get an marquee selection where your path is. Easy huh? 🙂


