(4 votes, average: 3.25 out of 5)
In this tutorial you will learn how to make reflections on virtually any object you choose. We will try to recreate a reflections on a water here…
Ok, so to start the tutorial, first open up some image containing water surface. For a good start we used this image below.

Step 1.
Now let’s add some text there. Use a text tool (shortcut is T), and type in some words by your choice. Make sure to use some bolder font typeface, like Impact or something other…

Now, check that your newly created text layer is selected in Layers Palette. If it’s not, select it and choose a Move Tool (shortcut is V). Go to image, hold ALT on keyboard, click on text, and holding that click drag arount unti you get copy of text layer, then release.
Right click on that copy of text layer in Layer Palette, and choose Rasterize Type.
Click on Edit ->Transform -> Flip Vertical.
And move around your text layer to match the position like on this picture below.

Step 2.
It’s time now to style this. Change blending mode of rasterized text layer to Hard Light, and make it’s opacity: 83%.
Choose a Eraser tool (shortcut E) from tools palette. Make it’s Brush size around 30 pixels (or whatever you need to cover half of vertical size of text layer), set hardness to around 13% , make sure mode is set to Brush, opacity to 55% and flow to 100%.
Now click on lower part of rasterized text and while holding SHIFT on keyboard drag from left to right side of text, until you get something like this:

Step 3.
Save your current work somewhere. Now open up your image that you use as background from start of this tutorial. When you open image click on Image -> Mode -> Grayscale.
Save this image as “displacement.psd” and make sure it’s PSD format.
Now go back to your saved work. Select that rasterized text layer and click on: Filter -> Distort -> Displace.
Change horizontal and vertical scale to 14.
Choose Displacement map: Tile.
Choose Undefined Areas: Wrape Around.
Click OK.
Now choose your displacement.psd file where you saved it.
Here is what you will get:

Final steps
You could additionaly decorate text layer if you like, add some bevels, strokes and such.
To get the complete effect move your text layer on top of that rasterized text layer, to get positions of layers like this:

…and change it’s opacity to 64%.
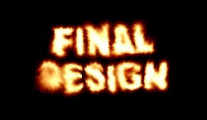
Result