In this tutorial you will learn one simple method of creating simple blue plastic text. This method can also be applied to other layer shapes rather than only text.
Step 1.
Create a new document, sized 700×700 pixels large. Select the blue color #1a68af as the foreground color. Use the Type Tool, and enter letter “q” without quotes, and resize it to fill most of the opened document. For the first time doing this try to use Times New Roman Bold+Italic font.

Step 2.
Next go to layers palette, make sure that text layer with “q” text is selected, and then hold CTRL and holding it left-click on that thumbnail of text layer. The text will be selected with marquee selection. Then create a new layer with this shortcut: CTRL + shift + N, and just press Enter on that box. Next thing to do is to contract that selection by some pixels. Go to: Select > Modify > Contract, and enter 15 Pixels there, click ok.
Step 3.
Now you got this result:

and your layers palette should look like this:

Now, to go on with the tutorial. Select White as the foreground color, and fill the selection on that “Layer 1” selected. (shortcut for fill the selection with foreground color is Alt+Backspace). Remove the selection by pressing Ctrl+D. Then, go to Filter -> Blur -> Gaussian Blur. Enter the value 16 pixels. Click Ok. Then, again go to: Filter -> Blur -> Gaussian Blur. Enter the value 8 pixels. And again for the last time: Filter -> Blur -> Gaussian Blur. Enter the value 4 pixels.
Step 4.
Select that “Layer 1” in layers palette if it’s not selected, change it’s blending mode to “Color Dodge” and leave the Opacity and Fill at 100%.

Double click on “Layer 1” to open Layer Style window. Click on Blending Options. Look under Advanced Blending section. You will see checkboxes for R G B. Deselect the one for R. Click OK.
Step 5.
Go to Layers palette. Select that “q” text layer. Hold down CTRL and left-click on that T thumbnail of the selected layer.

Then click onto Channels palette (right next to layers palette) and click “Save selection as channel” button. You will get an new Alpha channel.

Click on that channel to activate it. Then repeat blur effect your did earlier: Go to Filter -> Blur -> Gaussian Blur. Enter the value 16 pixels. Click Ok. Then, again go to: Filter -> Blur -> Gaussian Blur. Enter the value 8 pixels. And again for the last time: Filter -> Blur -> Gaussian Blur. Enter the value 4 pixels. Now, press CTRL + shift + I to inverse the selection. Press Del on keyboard to delete inversed selection and finally press CTRL + D to deselect.
Step 6.
Go back to Layers palette. Press down CTRL, and click on the q Layer thumbnail, to select it. Create and new layer (CTRL + shift + N), and drag it above all other layers: Select the new layer, fill the selection with black. Check on “Lock Transparent Pixels” button, and set the blending mode to Screen.

Step 7.
With “Layer 2” selected go to: Filter > Render > Lighting Effects…

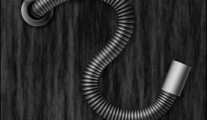
If you got marquee selection on, please press CTRL + D to deselect. Still left selected that “Layer 2” and go to: Filter -> Blur -> Gaussian Blur. Enter the value 2 pixels. You should now have something like this:

Step 8.
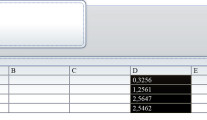
You have still “Layer 2” selected and now, go to: Image > Adjust > Curves… Make your Curve look like this on the picture below:

It’s simple, just press left-mouse click on that line and hold’n’drag untill you make it the similar shape as you see on picture above. When you have defined the curve, click OK.
Step 9.
Select “q” text layer. Double click on it. You will get Layer Style window opened again. Click on “Drop Shadow” checkbox. Enter the settings for drop shadow as on picture below:

Result